This article discusses how to record and make use of camera attitude metadata
Making a text record of where we shot a particular image used to be a simple process of writing on the back of a print the date, location and maybe the names of the people in the shot! Since film days and the advent of Digital Cameras and GPS we have made life a little more difficult for ourselves by wanting to record the exact location we shot the image and so Geotagging has become the normal!
So now not only do we have the GPS Latitude and Longtitude information, we also have the Compass direction that the camera was pointing towards and also the angle the camera was Pitched at and any Roll in the camera position.However whilst EXIF supports GPSLatitude, GPSLongtitude and GPSImageDirection there is nothing in the EXIF 2.2 specification to cater for GPSPitch or GPSRoll :-( Consequently cameras are not able to store this information directly in the Image metadata.
All is not lost however, the excellent utility EXIFTool written and maintained by Phil Harvey, allows the support of custom fields.
So provided your GPS device will log the extra information (as the Solmeta Geotagger Pro device I use does) then the extra information can be added to the images. Below is the method of achieving this: First you will need to install EXIFTool, if you don't already have a copy (if you use the utility Geosetter, see here, then this also includes EXIFTool as do several other geotagging facilities), so download and install the lastest version here making sure you choose the right version for your operating system!
Do make sure you create a command line version of the file by copying and renaming to "exiftool.exe" if your running Windows. Within the installation directory you have chosen you need to also create or copy the EXIFTool configuration file, this following link might look a little daunting but a pre-configured version is available in the next step! ".ExifTool_config" Please note if your using Windows or Mac this must be done from the command line because of the leading "." (dot) the previous link explains how under the Notes section!
If you don't already have an ExifTool_Config file then download and save this one which has the necessary entries for the two new paramaters and also has the extra parameters used by versions of Geosetter 3.4.29, the file has been Zipped to ensure that the leading "." is retained and can be dragged/dropped to the ExifTool installation directory without losing the leading "." ! This is all that needs to be done to ensure that the two new paramaters GPSPitch and GPSRoll can be both read and written by tools/utilities that make use of ExifTools. As a check that all is working as expected, lets run ExifTool against an image that has some Exif metadata and then add data for the two new fields, if you don't have a suitable image to hand then download this small JPG file
 to experiment with using Right Click and "save image as" or "save link as" I suggest you save it to the ExifTool installation directory for simplicity.
Now switch to a Command/Terminal window and issue the command;
exiftool test.jpg
All the metadata saved in the file will appear as a listing.
Now lets manually add data for the two new parameters using the command;
exiftool -GPSPitch=70 -GPSRoll=-5 test.jpg
The file will be updated, now lets view the results, but this time looking only at the GPS metadata using the command;
exiftool -GPS* test.jpg
Only the GPS metadata will be listed and within it you will see the two new fields with an upwards (positive) Pitch of 70 degrees and a Roll of minus 5 degrees. OK so you now have a working tool to read and write the full Camera Attitude along with its location, a point worth noting here is that despite the fact that the 3 Camera Attitude parameters are labelled as GPSxxx these values have NOTHING to do with the GPS system as such, they will have been provided by magnetic based Compass system or an Inertial Measurment Unit (IMU) however as the GPS section of the Exif metadata already allowed for Image Direction information it seemed best to keep the metadata within the same Exif data block. Now to use ExifTool and the logged data in a practical workflow I have developed the following procedure, whilst this obviously works for myself and setup, it may need to be tweaked to work with the GPS device and camera make you use! As most devices on the market currently are magnetic based, you need to ensure that the device is mounted and calibrated on your camera in the Horizontal plane, even if you are taking images in portrait orientation, hence I use a home made adaptor to keep the GPS device level. Whilst the GPS Latitude and Longtitude data would not be expected to vary a great deal whilst taking images for a spherical panorama the Direction, Pitch & Roll data will be changing as rapidly as you swing the camera hence you will need to set the logging rate as high as possible to ensure that you save data that is as close to the position you were holding the camera in as possible, I have found 1 second logging to be adequate, and if 0.5 second was an option I would use it but currently it isn't an option within the Solmeta Geotagger Pro - however I am sure that as devices appear in the future and more are built in within the camera then this requirement will be met!
With these factors in mind, you should now be able to gather the relevant data during a shoot.
For simple Pano's gathered with a single row and say a Fisheye lens then Pitch and Roll data is not going to be critical, the image direction data will be relevant but again does not represent a massive improvement using the current range of software e.g. PTGui and Hugin. Where the data really comes into play is with multi-row pano's especially where the number of shots on each row varies, or during the shoot you need to repeat shots due to lighting variations or strong wind movements - then the benefits will rapidly become obvious, see later.
On returning from a shoot, I will
- Upload all the RAW images and copy the GPS logging data into a folder for each individual Pano.
- Complete any pre-processing on the images and convert to TIF files.
- Its unlikely that the Camera clock and the GPS clock (UTC) records will be identical in the images, so the first step is to ensure that the Exif DateTime fields all hold the most accurate clock available which will be the GPS DateTime (UTC) so the following command is used to set all Exif Datetime to the GPS Datetime;
exiftool -AllDates<GPSDateTime *.tif - Next ensure that the correct time offset is used on all the Exif Datetimes as GPS Datetime is always UTC/GMT/Z so the command;
exiftool -AllDates+=1 *.tif
is used to add 1 hour to give in my case British Summer Time you will need to adjust the "+=n" as required to provide the required offset in your timezone! - The next step is to read the GPS Log file and use the ExifTool Geotag facility to add the GPS data available in the log files with this command;
exiftool -geotag *.nmea *.tif
you may need to alter the GPS log file name/extension (*.nmea) to suit your GPS devices log file format. - At this point each image should now hold all the relevant metadata required for alignment purposes.
- At the present time April 2012, PTGui does not read the Exif metadata for the 3 attitude parameters, so a further step is required to enable the images to be loaded into PTGui with the data present. This is achieved by running ExifTool and requesting it to list the data in a preset format that matches the minimum requirements for a PTGui Project file, this of course is based on the original PanoTools format and uses only the "p" and "o" lines for this purpose, and will hopefully only be required for a short time before stitching software makes use of the Exif data internally to give an inital alignment. So the preset format file is called Exif2PTGui-FE.txt for Fisheye lenses and Exif2PTGui-RCT.txt for normal Rectangular lenses (Right click and "Save link as" to save the files locally) in both cases the assumed output format is for Equirectangular 360x180 format however you can adjust the parameters yourselves to suit your particular requirements. To generate the file issue the command;
exiftool -p Exif2PTGui-RCT.txt *.tif >project.pts
followed by (Windows);
Type project.pts
to display the resulting file; - This file can then be loaded into PTGui and all the image files will be loaded and positioned according to the attitude of the camera. You will need to set Crop and Lens data as required.
- All of these commands can be combined into a single ExifTool multi-line command contained in a Windows batch file such as this exiftool2PTGui2.bat. Do note that the commands will take a few minutes to run as you are opening and scanning 30+ large .TIF files, the examples below took between 5 and 10 minutes each to complete.
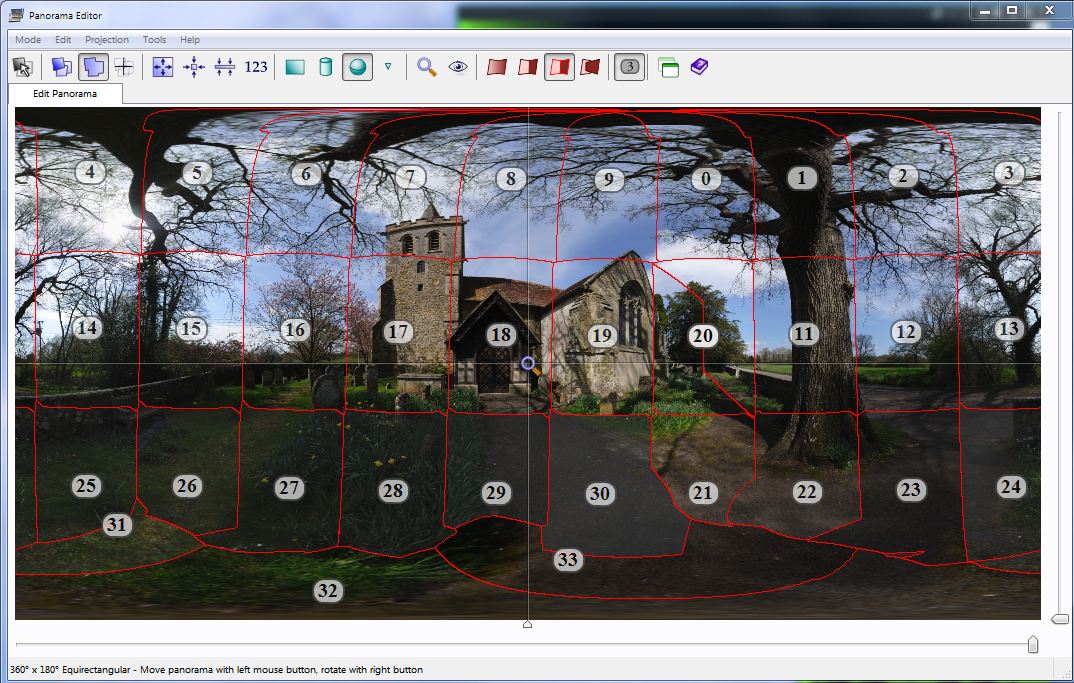
Examples of three Pano's are below, in each case 30+ images were taken and the resulting inital alignment and the final alignment views within the PTGui Edit window are shown;


In this first shoot, 34 images were taken, with one duplicated (20), for some reason the Pitch for image 21 was recorded to low, possibly as the camera was adjusted without a 1 second settling time to get the lastest data? Images 31, 32 & 33 were at -45° but offset to cover the Nadir using View Point correction.


In the second shoot, 33 Images were taken, in reverse order, other than for the final Nadir shots again taken as the last shots. Image 0 lies directy below Image 1 again no apparent reason other than allowing for sufficent settling time.


This final example used 39 images, as the middle row to the right were repeated due to a gust of wind blowing the tree branches badly so I waited until they had settled again before repeating, the images in the inital shot are overlaid, but are removed before the final alignment. Again the last three nadir images 36,37 & 38 require VP correction.
Customising EXIFTool within Geosetter
If you already have Geosetter installed then it is likely (unless you are missing a lot of free updates!) that you will already have ExifTool installed. If you also have a seperate copy of Exiftool installed as a command line application or with the ExifToolGUI then Geosetter will not be using the same copy of ".ExifTool_Config" installed as the standalone version. This can lead to confusion - as I found out! It is necessary (under Windows) to copy the modified ".ExifTool_Config" to each Users own local App data area where a seperate copy of the executables are stored as well as both Exiftools and Geosetter config files as they are on a per User basis. To find these copies look under (Windows 7) the path;C:\Users\%username\AppData\Roaming\GeoSetter\tools
After each update of Exiftools from within Geosetter it will be necessary to replace/modify the ".ExifTool_Config" file as it will be replaced by Geosetter automatically :-( Hopefully once Friedmann has included support for these parameters this will not be necessary, see below :-)
Other software likely to make use of GPSImageDirection, GPSPItch & GPSRoll
To date, April 2012,- Joost has it on his list for PTGui.
- Thomas has it on his list for Pano2VR.
- Friedmann has it on his list for Geosetter.