rasterkml

Creating high resolution images with Google Earth


how rasterkml works

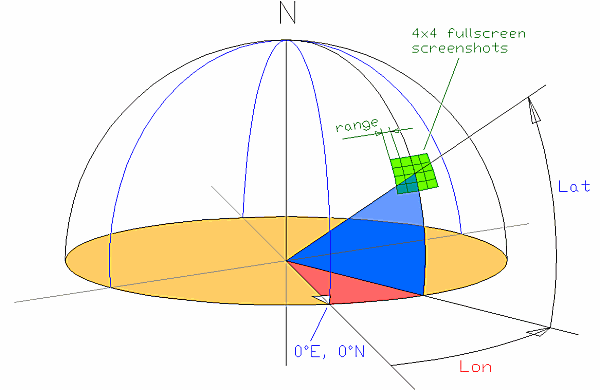
The sketch above shows an example of rasterkml where 16 overlapping views are being generated (the green surface). You will get a .kml file that contains a rectangular grid of these 16 viewpoints. You can now take a screenshot of every view (with Google Earth in fullscreen mode). Because of the overlap of neighbouring views your panorama software can regognize the repeating structure and stitch together the partial views to create a large panorama.

Enter your raster data:

Centerpoint-Longitude: ° The centerpoint of your panorama.
Centerpoint-Latitude: °
Range per Image (horizontal): meter   How many meters of landscape do you want to fit in one screenshot?
Amount of Images (horizontal):
Amount of Images (vertical):
Your monitor's horizontal resolution: pixels This is needed to estimate the amount of cropped off pixels.
Your monitor's vertical resolution: pixels
Image overlapping: %   Chose a higher value if your panorama software needs it.


A little converting tool: deg, min, sec -> decimal values

°   '   ''
 
Decimal degrees:  
Note that with negative coordinates all 3 values
have to be given as negative numbers.

How to proceed:

  • Open the .kml file in Google Earth and select the first point from this file.
  • Click on the View menu and unselect the compass and the status bar as this will disfigure your images.
  • Take a screenshot of every view. A good idea is to use IrfanView:
    • By pressing "C" you start the IrfanView capture mode. Then specify a directory and a capture shortcut (e. g. I use CTRL-F12).
    • Then go to the Google Earth settings and change the pause between tour points to something like 5 seconds.
    • Switch to fullscreen mode (F11) and start the tour (CTRL-ALT-P).
    • Every time an image has loaded, press the IrfanView capture shortcut. If the views are not fully loaded yet when the next viewpoint is displayed (less than 100% in the status bar) then you should either increase the pause time or run the tour more than once, so that the images are stored in your HDD cache for quick access. It is recommended to set the Google Earth RAM cache and HDD cache to ample values.
  • Clean the images by cropping off all unnecessary stuff: the menu on top and the information line at the bottom.
    • In IrfanView press "B" for the batch conversion mode:
    • Specify the output file format and edit the Special Settings. Enter the top left crop coordinates and the remaining image size. On a 1600 x 1200 screen I used (0; 55) as the top left point and (1600; 1040) for the width and height.
  • You have now a set of files from which you can create a large panoramic image. For beginners and those who are looking for quick and good results I recommend AutoStitch. For advanced users who know exactly what they are doing and also don't bother spending a lot of time Hugin might be the better option.

Additional information:

http://loh.fr/rasterkml.php, © 2006, 2007 Stephan Loh,